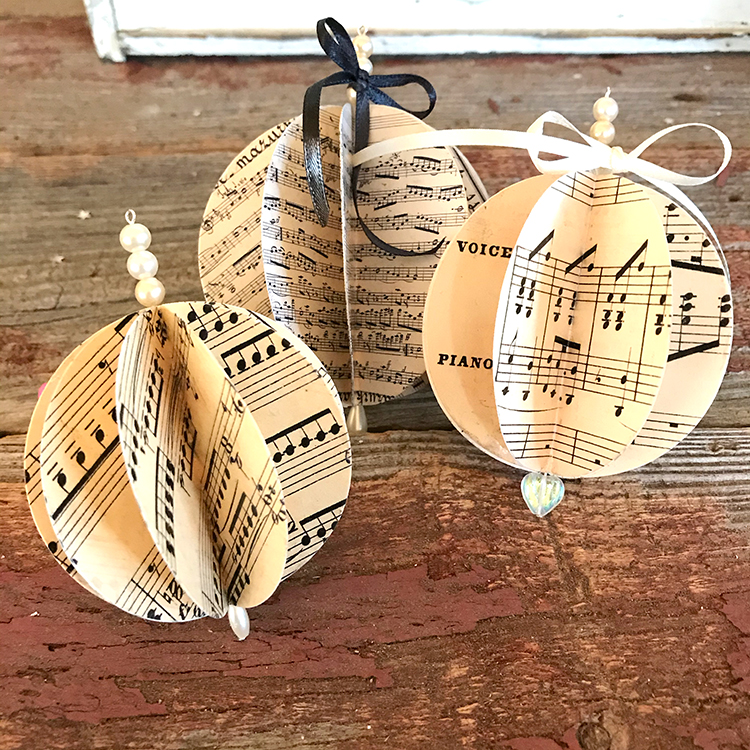
How to
Make Sheet Music Ornaments! - The Graphics Fairy

MATERIALS
TGF
Sheet Music Image HERE
HERE
HERE
Cardstock or Photo Paper
Circle Die (2″, 2-1/2″, 2-3/4, 3″ circle die)
Die Cutting Machine
Scoring Tool and Mat
White Glue or Any Glue for Paper
Strong Adhesive (Beacon 3 in 1 or Zip Dry Glue for Bling)
Long Head Pins and Stick Pins
Beads – I used pearls and pearl teardrop
Small Clamps or Clothespins
Thin Ribbon, Bakers Twine
SHEET MUSIC ORNAMENTS – STEP-BY-STEP DIRECTIONS
Step 1 – Print and Trim Sheet Music: I used my Ink Jet
on photo paper because I didn’t have enough white cardstock on hand. How that
happened, I don’t know! But you can use regular copy paper for this project as
well. The 2″ ornament was my test piece, and I made it with 20 lb. copy paper.
Keep in mind that it is a little more fragile than the cardstock ornaments.
Trim the sheet music so that it fits into your die cutting machine. (photo
below) Mine is 6″ wide. Yours may be different.

Step 2 – Cut Circles: You need 8 circles of the same size to make
this ornament. (HINT: You can use more circles to make a
fluffier ornament, but never less than 8.) I am using the French Sheet
Music with a 3″ die. Move your die around on the music to find a good
place to cut. (photo above) I was able to get a three inch circle and two
smaller circles to use for future projects out of each section of the
printable. Place the music and the die (make sure the cutting side is face
down) on the plates. Cover with a top plate and roll through your die cutting
machine. TIP: I was able to cut two layers of paper
at a time. If using paper you might be able to cut more layers. Separate the
circles.
A word about direction of
music. You have several options when creating with an image that has a
clear top and bottom direction like our sheet music. You can make all the
leaves read from top to bottom. This is the most difficult way, but it’s really
not very hard. It just requires more planning upfront and thought as you glue.
You can be willy-nilly about direction. This also takes a little pre-planning
when you fold and score them. Again, it is not hard to do! They all look good
as you will see in my samples.
Step 3 – Fold and Burnish
Circles:
This step must be done as perfectly as possible. If not, the ornament will be
wonky. With the image side facing up, fold in half matching edges. When you are
sure they are lined up, finger press your fold line carefully. (photo left)
Check that you don’t see any of the image hanging over an edge. Once you are
sure the fold is correct, burnish the fold with your scoring tool or bone
folder. (photo right)

Step 4 – Score the Circle: Open the circle
and place it carefully on your scoring board. Slowly score the circle. Repeat
Steps 3 – 5 with all circles.

Step 5 – Glue Circles: First, we will be
gluing 4 circles together to make two halves of the ornament. Lay 4 folded
circles out on your work surface in the direction you will be gluing them
together. TIP: Double check to ensure they are the
placed in the correct direction before you glue. Spread a little bit of glue on
one half of a circle. (photo left) Place another half circle on top, matching
the edges carefully. (photo middle) Press them together. TIP:
If any glue seeps out, wipe it immediately with a baby wipe or dry cloth. IT
should look like the photo at right when finished. Now fan it open to make sure
the image side is not stuck together like the bottom image. Repeat with next
set of half circles. You will now have two halves of the ornament. Lay them
down on your work surface, fanned out. Allow them to dry for several minutes
while you make the bling.

Step 6 – Making Bling: This step is
optional. You do not need to bling these ornaments at all. They look beautiful
without it. I wanted a vintage look of pearls, so I used three pearl beads on
an eye ring for the top. The hook will allow you to attach a hanger. I used one
pretty dangle bead on a head pin to accent the bottom of the ornament. But, you
can use whatever you like to decorate.

Step 7 – Add Bling to
Ornament:
Hold one side of ornament with the middle open like below. Place a bead of glue
along the center seam. Lay the beaded pins in the glue, making sure that the
eye pin pearls are at the top and the head pin dangle is at the bottom of your
ornament. IMPORTANT TIP: I used
white glue for mine. Some of them did not hold well when I went to hang them. I
would use a stronger glue for this step like Beacon 3 in 1 or even a super glue
that works for paper.

Step 8 – Add Other Side: This step is a
little tricky. You could use two more hands. WINK! Spread a little glue on each
side of the half with the pins. Hold the other section between your fingers as
shown below. Press one side down in the glue making sure that the edges meet
exactly. Then press the other side down. TIP: You will need to
fuss with them to get them perfectly in place. That is why I like the white
glue for this step. It allows me to move the paper longer.

TIP: I found it very helpful
to have small clamps to hold the sides in place while drying. I placed the
clamps near the pins as shown below. Allow to dry for 10 minutes like this.

Step 9 – Allow to Dry
Overnight: Remove the clamps carefully. Adjust the pins so the
pearls and the dangles are close to the paper like you see below. Spread the
leaves of the ornament and place it down on your work surface. It should sit up
on the surface like below with bottom leaves holding it. Allow it to dry
untouched overnight.

Optional – Add Ribbon,
Bakers Twine, etc: Add ribbon or bows if you like. I loved the simplicity
of a very thin black satin or velvet bow. You can also use Bakers Twine
or Jute to form a bow. I also like the look of just the pearl bling without a
bow. Another option is to also glue some ribbon through the middle of the
ornament instead of the bling pins. There are so many choices to finish the 3D
Paper Ornaments.

You can also use Bakers Twine or Jute to form a bow like below.
I also like the look of just the pearl bling without a bow. Another option is
to also glue some ribbon through the middle of the ornament instead of the
bling pins. There are so many choices to finish the 3D Paper Ornaments.